重要通知:Log4D 的域名由 http://dddspace.com 迁移到 http://log4d.com 。 订阅地址现在改为 http://log4d.com/feed 和 http://feeds.feedburner.com/dddspace 。(FeedBurner 的地址未发生变化)
这一次域名迁移的同时,我更换了服务器,由原先的虚拟空间迁移到独立 VPS。 现在使用的 VPS 是 PhotonVPS 。
月付5.95美元,使用优惠码 TENOFF 或 PHOTONLEB 可以打7折,
换算汇率之后是26人民币每月。
这款VPS的内存只有128,我们就要精打细算考虑如何省内存。经过我几天琢磨,
我终于配置的可用率比较高,使用 siege -c 100 -t 100 时候可以保持 100% 可用率。
(其实做不到这么高的并发,大概10个并发每秒)下面就是我记录的安装配置过程。
安装 LNMP
Linux 发行版选用
CentOS 据说有较好的安全性和性能,我个人更喜欢 Arch。查询了相关资料, 在生产环境使用 Arch 的似乎不多。
CentOS 里面的包比较旧,不像 Arch 里面,滚动最新。 所以这里需要用到的LNMP大部分都需要自行编译。
Nginx 安装
Nginx 的性能在小内存低配置的服务器上跑得比 Apache 要好。这是我们为什么选用 Nginx。
目前 Nginx 的最新稳定版是1.0.9版。CentOS 官方源里面搜索不到 Nginx,需要自行编译。
准备编译环境,需要安装一堆工具,使用下面这个命令 yum 安装。
yum -y install gcc gcc-c++ autoconf libjpeg libjpeg-devel libpng libpng-devel freetype freetype-devel libxml2 libxml2-devel zlib zlib-devel glibc glibc-devel glib2 glib2-devel bzip2 bzip2-devel ncurses ncurses-devel curl curl-devel e2fsprogs e2fsprogs-devel krb5 krb5-devel libidn libidn-devel openssl openssl-devel openldap openldap-devel nss_ldap openldap-clients openldap-servers
下载Nginx
cd /tmp
wget http://nginx.org/download/nginx-1.0.9.tar.gz
因为我们需要安装使用https,所以需要SSL模块支持,我们需要OpenSSL源码。
wget http://openssl.org/source/openssl-1.0.0c.tar.gz
tar zxvf openssl-1.0.0c.tar.gz
编译Nginx,使用www作为用户和用户组,同时加入http ssl模块支持。
./configure --user=www --group=www --prefix=/usr/local/nginx --with-http_ssl_module --with-openssl=/tmp/openssl-1.0.0c/
make
make install
这样nginx就安装完了,执行 /usr/local/ngxin/bin/nginx -V 可以查看nginx信息。
nginx: nginx version: nginx/1.0.9 nginx: built by gcc 4.4.4 20100726 (Red Hat 4.4.4-13) (GCC) nginx: TLS SNI support enabled nginx: configure arguments: –user=www –group=www –prefix=/usr/local/nginx –with-http_ssl_module –with-openssl=/tmp/openssl-1.0.0c/
为nginx 创建软链接
ln -s /usr/local/nginx/sbin/nginx /usr/bin/nginx
ngxin 启动关闭
nginx #启动
nginx -s stop #关闭
nginx -s reload #重启
运行 nginx 就可以启动服务器了,在浏览器输入服务器ip, 能够看见 nginx 的字样。
MySQL安装
MySQL我没有自行编译,使用CentOS官方源里面的Mysql。
yum install -y mysql-server
PHP安装
PHP需要自行编译,原因是Nginx使用Fast-CGI调用PHP服务。 我们需要php-cgi常驻后台。在PHP 5.3.3之后, 一个名为php-fpm的小东西被php核心加入。这个php-fpm可以常驻后台响应Fast-CGI请求。
悲剧的是,截至目前位置,CentOS官方源里面PHP版本是5.3.2, 好死不死的差一个小数点。只能自行编译了。
安装libmcrypt,这是某个依赖包,另外phpmyadmin也需要这个模块。
wget http://pkgs.repoforge.org/libmcrypt/libmcrypt-2.5.71.2.el6.rf.i686.rpm
ls
rpm -i libmcrypt-2.5.7-1.2.el6.rf.i686.rpm
rpm -i --force libmcrypt-2.5.7-1.2.el6.rf.i686.rpm
安装php 5.3.8
./configure --prefix=/usr/local/php --with-config-file-path=/usr/local/php/etc --with-mysql=/usr/bin/ --with-mysqli=/usr/bin/mysql_config --with-iconv-dir=/usr/local/libiconv --with-freetype-dir --with-jpeg-dir --with-png-dir --with-zlib --with-libxml-dir=/usr --enable-xml --with-curl --with-curlwrappers --with-mhash --with-mcrypt --with-gd --enable-gd-native-ttf --with-xsl --with-openssl --with-ldap --with-ldap-sasl --with-xmlrpc --without-pear --enable-zip --enable-soap --enable-mbstring --enable-ftp --enable-sockets --enable-pcntl --enable-bcmath --enable-shmop --enable-sysvsem --enable-inline-optimization --disable-rpath --enable-mbregex --enable-safe-mode --enable-fpm --with-fpm-user=www --with-fpm-group=www
make
make test
make install
运行LAMP
现在环境已经安装好了,我们稍作配置,然后启动系统。
在nginx的 /usr/local/nginx/html/ 下创建 info.php。
<?php info() ?>
配置nginx,编辑 /usr/local/nginx/conf/nginx.conf 其中的 server 段。
location ~ \.php$ {
        root           html;
        fastcgi_pass   unix:/var/run/php-cgi.sock;
        fastcgi_index  index.php;
        fastcgi_param  SCRIPT_FILENAME  /usr/local/nginx/html/$fastcgi_script_name;
        include        fastcgi_params;
}
配置php-fpm,编辑 /usr/local/php/etc/php-fpm.conf
listen = /var/run/php-cgi.sock
运行 nginx -s reload 重新启动nginx服务器。运行 /etc/init.d/php-fpm start
启动php-cgi监听。
在浏览器输入 your.domain/info.php 会出现php信息,成功的话,
就说明LNMP配置成功了。
小内存主机配置
经过上面的步骤,已经可以成功的配置完LNMP系统,但是默认的配置情况下面,
内存会相当吃紧。一会会就系统内存爆掉,Nginx会频繁报出
The page you are looking for is temporarily unavailable. Please try again later.
,不配置就不能用啊。
Nginx配置
我的nginx优化配置如下,主要是配置 worker_processes 数量和
fastcgi 、 gzip 缓存。
user  www www

worker_processes 1;

events {
	worker_connections 1024;
	use epoll; #使用高效率的epool模式
}

http {
	include mime.types;
	default_type application/octet-stream;

	sendfile on;
	keepalive_timeout 65

	# 下面是配置缓存
	client_header_buffer_size 32k;
	large_client_header_buffers 4 32k;

	fastcgi_connect_timeout 300;
	fastcgi_send_timeout 300;
	fastcgi_read_timeout 300;
	fastcgi_buffer_size 32k;
	fastcgi_buffers 4 32k;
	fastcgi_busy_buffers_size 32k;
	fastcgi_temp_file_write_size 32k;

	# 下面是弃用gzip压缩缓存
	gzip on;
	gzip_min_length 1k;
	gzip_buffers 4 16k;
	gzip_http_version 1.0;
	gzip_comp_level 2;
	gzip_types text/plain application/x-javascript text/css application/xml;
	gzip_vary on;

	#server 的内容我就不列出了
	#….
}
MySQL配置
mysql的配置文件在 /etc/my.cnf ,我们需要配置两样东西,
一个是禁用innodb,因为innodb比较消耗内存;另外是配置mysql缓存。
[mysql]
no-auto-rehash

[mysqld]
datadir=/var/lib/mysql
socket=/var/lib/mysql/mysql.sock
user=mysql
# Disabling symbolic-links is recommended to prevent assorted security risks
symbolic-links=0

open_files_limit = 600
back_log = 20
max_connections = 100
max_connect_errors = 200
table_cache = 60
external-locking = FALSE
max_allowed_packet = 16M
sort_buffer_size = 128K
join_buffer_size = 128K
thread_cache_size = 10
thread_concurrency = 8
query_cache_size = 0M
query_cache_limit = 2M
query_cache_min_res_unit = 2k
default_table_type = MyISAM
thread_stack = 192K
transaction_isolation = READ-UNCOMMITTED
tmp_table_size = 512K
max_heap_table_size = 32M
long_query_time = 1
log_long_format
server-id = 1
binlog_cache_size = 2M
max_binlog_cache_size = 4M
max_binlog_size = 512M
expire_logs_days = 7
key_buffer_size = 4M
read_buffer_size = 1M
read_rnd_buffer_size = 2M
bulk_insert_buffer_size = 2M
myisam_sort_buffer_size = 4M
myisam_max_sort_file_size = 10G
myisam_max_extra_sort_file_size = 10G
myisam_repair_threads = 1
myisam_recover

skip-innodb #禁用innodb数据库引擎

[mysqld_safe]
log-error=/var/log/mysqld.log
pid-file=/var/run/mysqld/mysqld.pid

[mysqldump]
quick
max_allowed_packet = 16M
PHP配置
我们使用php-fpm来作为后台daemon响应FastCGI请求。 默认的php-fpm会启动比较多的子进程,很容易耗光内存。
listen = /var/run/php-cgi.sock #使用socket监听,不用端口监听
pm.max_children = 2 #默认是50
pm.start_servers = 2 #默认是20
pm.min_spare_servers = 2 #默认是5
pm.max_spare_servers = 2 #默认是35
有的配置手记是建议把上面几个数字改为5,我经过多次调试之后, 发现使用最小/最大连接数为2的时候,可用率比较高,内存消耗也比较小。
运行结果
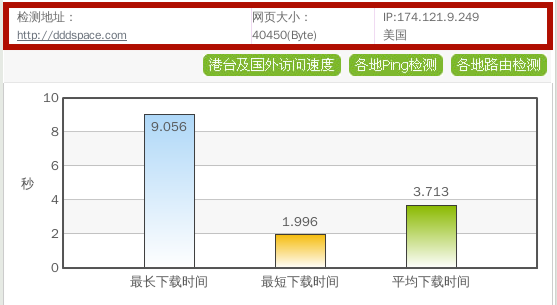
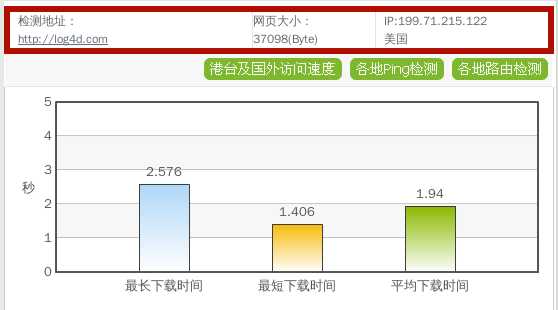
经过一番折腾之后,我的 Log4D 终于配置完成了。 打开速度还算凑合,用WebKaka测试截图如下。
原来的虚拟主机 dddspace.com 的响应情况:
现在 log4d.com VPS 的响应情况:
内存使用情况:

siege -c 100 -t 100 log4d.com 的测试结果:
Transactions:		        1711 hits
Availability:		       96.61 %
Elapsed time:		      416.72 secs
Data transferred:	       18.20 MB
Response time:		       22.12 secs
Transaction rate:	        4.11 trans/sec
Throughput:		        0.04 MB/sec
Concurrency:		       90.84
Successful transactions:        1711
Failed transactions:	          60
Longest transaction:	       30.31
Shortest transaction:	        1.06
参考链接
- wordpress nginx php-cgi mysql在128m内存下的vps安装和优化手记原创
- centos LANMP之三(编译安装 php 5.3.6)
- 编译包含 SSL 模块的 Nginx 时使用新版本的 OpenSSL 避免已知的 SSL/TLS 协议弱点
原文链接: 128M内存VPS LNMP安装优化小记 | Log4D
3a1ff193cee606bd1e2ea554a16353ee
欢迎关注我的微信公众号:窥豹